Saturday, December 26, 2009

Recycle craft Bottle cap ceiling lamp

Friends, i was quite busy these days with new office atmosphere. Yes, i changed my job and now in this new company quite busy with training and work. Late to home so could not find time for any updates. Thought of wishing you all a "Merry Christmas" yesterday but, unfortunately my Internet connection got into some trouble and was not working.

Anyways promise you to keep on updating once in a week for sure. This time i tried out this wonderful recycle craft which i was planning to do long back. Now sharing with you all as soon as i found time and completed my work.

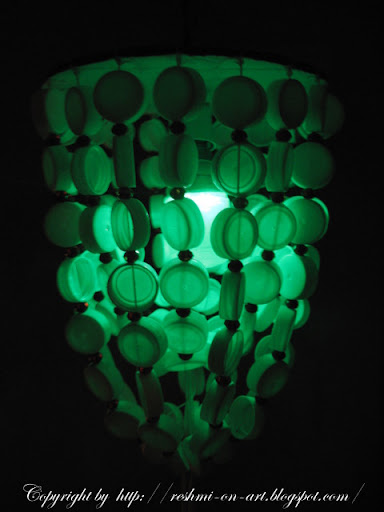
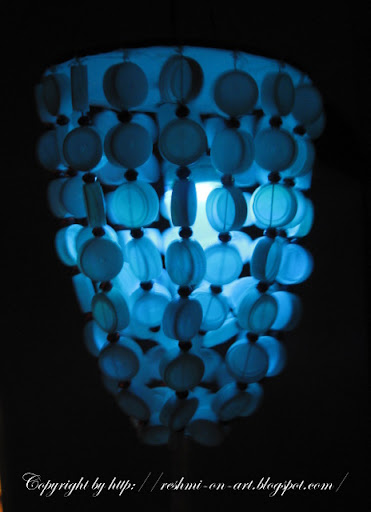
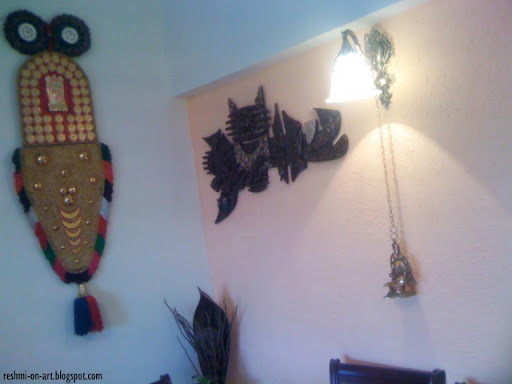
This is a ceiling lamp made of plastic bottle caps. I used almost 120-150 caps of Bisleri bottle to make this lamp.

All you need is a round piece of hard board nylon thread and some beads around 120- 150 as per your caps. Take the nylon thread as per the length and make holes on the caps and move cap and bead alternatively and now tie this on the hard board my making a hole on it.

So let me know how much did you all like this Recycled Ceiling Lamp made of bottle caps.


Recycle-Bottle-cap-craft

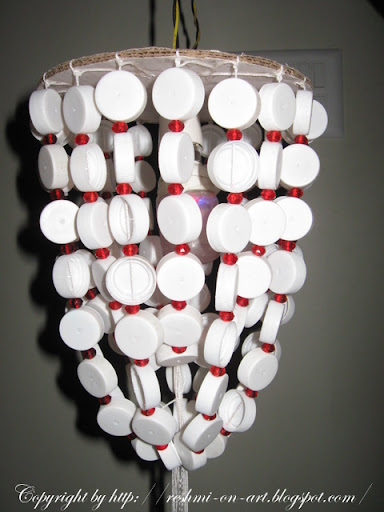
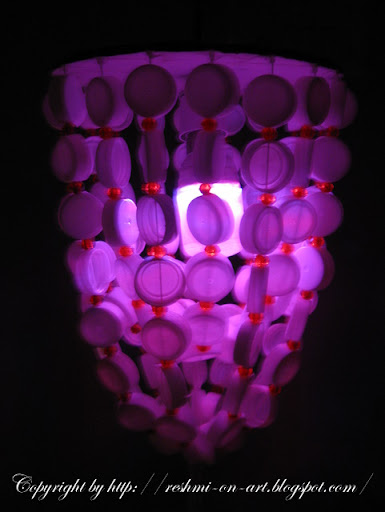
The lamp with colourful lights.

Bottle-cap-ceiling-lamp

Coloured-bottle-cap-lamp

Recycled-craft-bottle-cap-Ceiling-lamp

Thursday, December 10, 2009

How to make stocking Tulip flowers?

Sorry everyone for late updates again.

This time I'm here with stocking tulip flowers.
Firstly a big "THANKS" to the person who send me this video of making tulip flowers out of stocking material and here i tried my hands on it.

These tulips look extremely beautiful after making them as per instructions. Earlier i tried making tulips but not with the help of this video. may be coz for wrong way of making it looked like some other flower :)

So now with a proper making method I'm here to share this with you all.

Here is the video for you to make Tulip flowers.


Now tell me how is the one made by me.. :)
Comments please.


Bright-yellow-tulip-flower

More closer view of colourful tulips.

stocking-tulip-flowers

Colourful-stocking-tulip-flowers

Tuesday, December 1, 2009

Back after a long vacation...!!!!

Friends..!!!
I was on a long vacation this time. Was having fun in Kerala and Bangalore. This was after a long time i was going to my native place and was completely relaxed.
Sorry.. as i couldn't tell you all before leaving. I left to Kerala on 9th Nov and was back to Mumbai on 27th Nov.

This time i really enjoyed my vacation. All time roaming around with relatives and cousins.. Enjoyed the cool climate and was very relaxing. This time i got chance to see more places in Kerala as we did spend more time there.

I was in Blanglore for the first time and i just loved the city. Unfortunately, i couldn't spend much days there... Anyways better luck next time.

So, my vacations got over and now back to the busy schedule.

Now you will see some more new craft coming up..

Keep on reading trying out new things.

Sunday, November 8, 2009

Making Shell Work Photo frame

Back with a new thing after some more gap.

Here I'm with a Shelly photo frame. Yes, I'm here with a photo frame decorated with beach shells.

I got these ready shells and a wooden photo frame. And then the photo frame was decorated with these fancy shells.

Here is the piece of work done by me.


Double-sided-picture-frame-Shell-floral-designs

This is the second side of the photo frame.

Shells-Floral-designs

A closer view on the flower design made with shells.

Shell-Flower-designs

Here is the completed work on Photo frame.

Photo-Frame-shells

Saturday, October 31, 2009

Creative Crafter of the month Award

Friends,
My friend and Co-blogger Kavitha has conducted a contest for which everyone supported me and voted me for the same.

I'm extremely thankful to all of you to vote for me. And friends your support did really work out. I did win the contest and i'm awarded with the "Creative Crafter of the month".

Thanks to all of you and CONGRATS.. !!!!! to Anuradha she was one of my personal favourite.


Creative-Crafter-of-the-month

Wednesday, October 28, 2009

Reshmi On Art Facebook pages

Hi All ,

I am happy to announce my facebook fan page .. if you have a facebook account please join my fan club here .


Also send me a facebook friend request here

Reshmi Nair
Reshmi's Art Craft blog

Saturday, October 24, 2009

How to make 3D Quilled Rose flowers

There was lot of things that i did in quilling, but never tries out a rose like flower. This time i tried out paper quilled Roses, I learnt this technique from the Quilling book i got recently.

Yes, the book helped me to learn new techniques in quilling. And here comes this beautiful quilled rose made by me.

I had seen lot of paper Quilled roses and used to wonder how can this be made. And see this i made it finally.

I had to try hard to make this. You just need is the quilling tool and 10mm quilling paper strip to make this beautiful 3D Quilled roses.

However, as i learnt from the book i wont be proper with explaining how to make as the quilled roses needs picture instructions.
So, here is a video for you to learn how to make Quilled paper roses.

Here is the video for you.


And friends here is the quilled bunch of roses made by me.
Let me know if you liked it. So, enjoy the video and try making these beautiful Quilled Roses.


3D-quilled-paper-rose-flowers-bouquets

A closer view of the Quilled little Roses.

Quilling-paper-Rose-flowers

Related Posts - Quilling Craft Designs
Diwali Diya with Quilled Roses
3D paper Quilling JOker
Quilling Eccentric Circles design

Wednesday, October 21, 2009

Please vote for me

Hi friends, i have participated in a contest conducted by "Kavitha". of Kalalayaa Art club.

So, friends please vore for me if you like my work.

You can find the details here .

NOTE : When you reach the blog , There is a poll happening with the heading "CHOOSE YOUR FAVOURITE CONTESANT" . Please check my name and VOTE (only if you like my work :) )
Thank you so much.

Friday, October 16, 2009

Diwali Rangoli designs and patterns

Too much of Diya now. So a little bit of change in Diwali, here i'm with Rangoli patterns for Diwali.

Diwali festival of lights, we decorate our home with all possible things we can. So rangoli is also one of the major things that we look out for at the time of Diwali.

I'll have a fresh post on Rangoli tomorrow, but till then i hope you all will check out my old post on "Colourful Rangoli for Diwali".

So guys stay tuned will be back with some good Rangoli designs for sure.

HAPPY DIWALI TO ALL OF YOU..!!!!

Thursday, October 15, 2009

Quilled Diwali Diya patterns ideas

Friends, you might have seen all of my work on diya which is painted and decorated which lot of colours.

Today I'm bringing you a different diya decoration, yes a quilled diya with quilled Rose and some dried leaves decorated to it.

Yes this diya was a different one i did, i was planning to have Warli painting on this diya which changed my mind to do something different other than just painting on it, So here is my new quilled Diya which is I'm very sure quite different from all Diya.

You can all have a try on it. I'm sure you will enjoy doing this Quilled diya and i can bet anyone who see this different Diya would surely love it.

I hope you all will have try on it.

Here is my quilled Diya. Comments Please :)

Here is the quilled rose for diya decoration.


Quilled-Rose-Diwali-Diya-Design

Here is the diya decorated with Quilled roses and dried leaves and some kundan stones to it.

Diwali-Diya-Quilled-Rose-Decoration

Quilled-Paper-Rose-Diwali-Diya

Related Posts - Diwali Decorations

Making colourful Diyas for Diwali
How to decorate diya for Diwali
Colourful Rangoli desings for Diwali
Diwali diya designs and patterns

Wednesday, October 14, 2009

Diwali Diya designs and patterns

It's Diwali time and you can see more of Diyas, Rangolis, Cards, Gifts and all.

I'm back with more of Diwali diya designs and patterns. This time i got lot of diya for decorating my place and I'm really happy doing this.

As always today also I'm back with a diya design for all of you. I hope you all will like all these patterns and designs.

Its not over I'll be back with a jumbo diya. :) Yes i have a diya of a bigger size than the normal one, will plan some good designs on it and will be back soon.

I hope you all like other posts on "Diya Decoration for Diwali". and my latest post "Diwali Diya ideas and patterns".

Till then enjoy this post and do let me know how is it?

Comments please :)


Decorated-Diwali-Designer-Diya

Designed-Diwali-Diya

Related Posts - Diwali Decorations

Making colourful Diyas for Diwali
How to decorate diya for Diwali
Colourful Rangoli desings for Diwali
Diwali diya designs and patterns

Tuesday, October 13, 2009

Designing Diwali Diya ideas patterns

As i promised i'm back today with more diya designs and patterns. I just loved doing these diyas.

I still have 2 more diyas left with me to decorate it. Till then as i told you all i'll be showing you all new diya designs.

You may still have a look at my post on diyas "Diya Decoration for Diwali"..

For any of the diyas i didnt use any mirrors or lace or any stones to it.. Its completely painted.

One more thing, you may have a doubt that the colour will go when we light Diya. Its obvious that you might see a slight change to the colour but it wont completely go off.

To fix the colour to diya and reuse it. You can apply varnish after to paint the diya so that the colour wont go and the Diya can be used in the same manner.

So friends enjoy this new post on Decorating diya. Will come up with more for Diwali.


Designer-decorated-Diwali-diya

A leaf shaped diya which is the most simple one among these decorated ones. I have just coloured it with green colour and a golden yellow ouline.

leaf-design-decorated-diwali-diya

Have a complete look in all my new diyas.

Designer-Diwali-Diyas

Related Posts - Diwali Decorations

Making colourful Diyas for Diwali
How to decorate diya for Diwali
Colourful Rangoli desings for Diwali

Monday, October 12, 2009

Making colourful Diwali Diya Designs

Hey friends, its Diwali time. I hope everyone is busy with cleaning and shopping and preparing some mouth watering dishes.

The same with me as i was busy making some beautiful looking diya for this Diwali.
I made this little two diyas this time.

I got some plain diya which is easily available in market and coloured it using acrylic colours and some tube colours.

The colour combination you use matters when you paint a diya. You can do anything to a plain diya. If you are not good with colours and painting then try out using some shells, mirrors, lace etc.

I'm sure everyone liked the diyas i made last year. Look out for my last year's work on Diya Decoration for Diwali.

Look at the one i made now.


Diwali-Diya-Decoration

One more of my little creation on decorating Diya.

Sunflower-Diwali-Diya-Decoration

Do comment on how did you like the diya ??

This is not over I'll be back with more decorated diyas tomorrow.

Till then Happy Blogging...!!!


Related Posts - Diwali Decorations

Diwali diya designs and patterns
How to decorate diya for Diwali
Colourful Rangoli desings for Diwali
Diwali diya designs and patterns

Thursday, October 1, 2009

Making quilled heart shaped flowers

After some long gap back with quilling techniques. I was just guessing you all will be bored of lot of quilling posts by me. There were days when i only used to post on quilling, so just had a change for sometime a long break was given to all quilling crafts.

Now after the break I'm back with this cute little simple quilled flowers. This is much simple heart shaped flowers. These flowers are just clubbed up together and made a bouquet not difficult to make but the outcome is really pretty.

Here i made just some heart shaped red flowers and then green stems attached to it.
and tied it to a small piece of paper strip.

Here is the one i made. Let me know how is it ?


Quilled-Heart-Shaped-Flowers

The complete look of the Heart shaped flower bouquet.

Quilled-Flower-Bouquet

Note :

I am really happy to announce that I am participating in a craft event conducted by kavitha of kalalaya craft blog . Find the details at

Tuesday, September 29, 2009

Dandiya Stick Decoration

Friends after some more long break back with a little decoration technique. If you all remember i had a competition last year at the time of Navratri Festival, it was Matka Decoration competition at my office.

So, the same continues this time also, but to be different we had Dandiya Stick decoration competition for which i stood "Second" this time and was much happier with my Dandiya stick.

I was a bit late to upload this, but still now you can have a look at it.

We were asked to decorate the stick anyway and was supposed to make it as much as attractive as possible.

So, here comes my stick with lot of Kundan stones, Golden lace, mirror and some beads.

Here is the first portion covered with Bandhani cloth and Golden lace and Kundan stones and all those possible decoration items.


Dandiya-Stick-Decoration-Bandhani-Cloth

The second half part the basic handle part decorated with Golden lace.

Dandiya-Stick-Decorated-Golden-Lace

And now here is the completed Dandiya Stick.

How is it ??


Dandiya-Stick-Decoration

Related Posts - Navratri Decorations

Navratri Matka Decoration

Tuesday, September 15, 2009

Making Duplex paper Lotus Flowers

Back again..!!! My search on Origami papers are still on. Actually people here doesn't even know what kind of papers they are. Anyways i got some information from Nithya about Origami papers now available in Mumbai. I'm surly gonna try getting those papers.

But after seeing a video on Origami paper Lotus flowers i was so eager that i could not wait till i get those Origami papers. So i tried out making this little Lotus flower using Duplex paper. Duplex paper was anyways a good substitute for Origami papers.

However, It came out quite good even with Duplex paper.

I'll be back with more of such paper flowers when i get Origami papers.
Till then enjoy this Lotus flower made of Duplex paper.

Here is the tutorials for Lotus flower Making Origami Lotus Flower

Look at these little lotus :)


Duplex-paper-Red-Lotus

Duplex-paper-Lotus-Flower

Sunday, September 6, 2009

Making Duplex paper Speaker Flowers

After a long time back with paper flower making. Here i did a very simple but really good looking speaker flowers.

Making of Speaker flowers were quite simple even for one who has never made any flower try out this one.

Materials:
1. Duplex paper
2. Pollens / pips
3. Green Tape
4. Flower making thread
5. Aluminium wire

Method:

1. First cut triangle piece of duplex paper and stretch the edges of the paper to give a slight curve.

2. Apply glue on one end and stick the other end to it. You will get a cone shape of flower, stretch the edges again fine to get the curve of flower.

3. Take some pollens / pips and attach it to the aluminium wire.

4. Now pass on the wire through the cone shaped flower and tie it tightly.

5. Now cover the rest wire using green tape.

And here is my simple beautiful flower ready.

I give the credit to Kalalaya Art club where i learnt this Speaker flower, here i tried is a bit different procedure. You can view the Making Speaker flowers here from Kalalaya Art club.

Here is the one i made. Awaiting for your valuable comments:)


Duplex-Paper-Speaker-Flowers

Complete view of flowers.

Bright-coloured-Speaker-Flowers

Related Posts - Flower making

Making Sponge flowers
Duplex paper Daffodil flowers
Duplex paper Carnation flowers
Duplex paper Camellia flowers
Organdi cloth Dalia Flowers
Organdi cloth Rose Flowers

Sunday, August 30, 2009

Making Sponge Flowers - White Roses

Back with one more interesting craft. Making flowers using Sponge. These sponge flowers are done earlier by me, but those were different quality of sponge. It was plastic sponge. You can check out those Making white sponge flowers.

Here is the normal sponge that we all know. So now i have made cute little roses out of these normal sponge material:

Materials needed:

1. Sponge (Any colour)
2. Aluminium wire
3. Thread
4. Green tape

Method:

1. Take a rectangle piece of sponge of and fold it into half lengthwise

2. Take a piece of aluminium wire and wrap the folded sponge over the wire in circular motion.

3. Tie the sponge using thread and wrap it with green wire.

Sounds simple right ?? And yes it is really simple.

Look at this picture and you will come to know.


Sponge-Flowers

Here is the completed arrangement of Sponge flowers. Have a look.

Litte-Rose-Sponge-Flowers

A different angle to the picture :)

Sponge-Flowers-Bunch

Related Posts - Flower making

Making Sponge flowers
Duplex paper Daffodil flowers
Duplex paper Carnation flowers
Duplex paper Camellia flowers
Organdi cloth Dalia Flowers
Organdi cloth Rose Flowers

Wednesday, August 26, 2009

Queries on ceramic mural art materials

My ceramic mural is still my favorite and i guess all my visitors favorite too.
I'm getting lot of mails and comments for my Ceramic mural work.

Now, I have received similar kind of comments and mails asking for what exactly is whitening powder and DINK and where are these materials available.

1. About whitening powder its easily available in hardware stores. As for just normal Whitening powder. You can also use ceramic powder as a substitute instead of whitening powder.

2. About DINK i have mentioned in details about what is DINK in my post on Making Ceramic Mural Art - African Mask. I know this name as DINK, this is proper Indian name.

You can get Dink easily available in Grocery stores. If anyone gets it and has a different name for DINK please do let me know.
So that I'll be sharing it with everyone .

I hope everyone is clear about whitening powder and DINK.

Thank uou. :)

Sunday, August 23, 2009

Origami paper Tulip Flowers Video

Hi, here is something for you which you have never seen made by me, yes some paper craft, some Origami paper craft.

Anyhow i would desperately like to try this out, unfortunately i could not get Origami papers here. So, my search is in progress. Still i would like to share this beautiful video with you all.

Here is a video on making of awesome looking Tulip flowers.

I hope you all will like this. Anyone who does tries out this flower can share your work with me. I would like to see those flowers.


Here is the video for
Making Origami Tulip flowers.

Tuesday, August 18, 2009

Making Ceramic Flowers Photo Frame

Hi friends, I hope you are all not bored of reading my Ceramic posts on daily basis. Anyways here is one more of my work with Ceramic material.

This time the materials and method are all the same itself. The only difference is its made on a photo frame.

Yes a nice little photo frame for anyone you would like to gift.
This was a plane wooden photo frame beautifully decorated with ceramic made Casa Lilly flowers and some uncut stones.

The procedure to make ceramic dough viewed here Making Ceramic Mural Art - African Mask.

This dough can be kept for long time if its maintained properly by binding it in wet cloth.

So here is the photo frame made by me. This was a gift again.

So friends how is the work? Ceramic work is always something new when its done on new materials. :)

This is Casa Lilly flowers made of Ceramic dough. Was i quite simple work but looked very elegant.


Ceramic-Casa-Lilly-Flowers

Ceramic-White-Casa-Lilly-Flowers

Frame arranged with flowers and uncut stones.

Ceramic-Work-Photo-Frame

Here is the completed work. :) How does this frame look now, from a plane wooden frame to a attractive decorated frame.


Related Posts - Ceramic work

pot-painting-lovely-dove
pot-painting-Ceramic flowers on pot
Ceramic work on cup
Ceramic Mural Art

Wednesday, August 12, 2009

Ceramic Mural Art on wall

I'm very happy to see such good response for my Mural work.

This was my first big project that too something different on what i was doing these days. Thanks to all of you who appreciated my work and a special thanks to my brother and sister who loved my work and supported me to do more of such work.

I would like to share some more pictures of my Mural work finally hung on the wall.

It looks absolutely great on the wall.

Thanks a ton to my brother and sister who appreciated my work and very happy to know they liked it.

They have send me some pictures of my Mural work hanging on their wall

Click here to see my work on Making Ceramic Mural Art - African Mask

So happy to see this.


wall-Ceramic-mural-Art

African-masks-Ceramic-Mural-work

Thanks to everyone. :)

Sunday, August 9, 2009

Making Ceramic Mural Art - African Mask

Hello everyone, as i promised I'm here back with the Ceramic Mural work.
I'm so happy that i completed my work and this was a gift to my sister. She is very much happy with my gift.

This work took almost 2 months to complete because of lot of delays and all. Anyways i felt very happy to see the completed work.

I would also be happy to share my Ceramic work with you all. This is a kind of an African art form with African masks and the real effect textures and all.

I hope you all will enjoy this work a lot.

So lets start with the tutorials. I hope you all wont be bored with the tutorials as its a too long one.

Materials used:

1. Whitening powder
2. DINK adhesive
3. Fevicol (White Glue)

If you have referred to my post on How to do Ceramic work on Cup?you might come to know what is DINK and the procedure to make it. But still i will let you know what DINK is all about.

DINK is edible gum crystals are available in small pieces especially meant for eating after being cooked. Brownish variety DINK is basically used for adhesive purpose.

You need to get 1kg of DINK grind it properly and make fine powder out of it. Now soak the powder in water. The water level and DINK powder level should be same, check out the next day and you can find it sticky and highly adhesive.

This was all he making of Ceramic dough.

Now to start with the actual making of Mural base. The Ceramic Mural base is made of plywood. I have used a reference for making the base. Using the base some cutout were made for the shapes and the same were cut on plywood.

Now arrange all those plywood pieces using hammer and nail. Yes some bit of Carpenter work too. :)

After you finish doing the base for plywood. Take Ceramic dough in required quantity and make it flat round any shape and plly it on the plywood shaped pieces.

Make sure you remove the excess quantity the comes out of the plywood pieces and the dough should be pasted on the all the pieces, or as you wish on some pieces.
On rest of the plywood pieces we can do some cone work as i did in some of the shapes.

Now I have the completed work. I can explain you what I did to get these effects. The colours are black, copper and golden colour effects.

Here i used some coloured stones on the middle big piece. The texture for four stick pieces on back side of Sun is some used doing old pen and toothpicks and just small quantity of ceramic pieces on the stick the and toothpicks.


Ceramic-Mural-sun

Here the mask is made using a mask mould and some hand detailing too done to it.

Ceramic-mural-african-mask

One more mask using mould. This was the smallest mask i made for this mural.

Ceramic-mural-faces

Here the impressions are used with the help of some local tools. Let me tell you i used here is all kind of refills. Yes pen refills and unused pen. Bottom of some refills looks like a flower shape those are some of the impressions.

Ceramic-mural-toll-impressions

Here the complete work is cone work on all pieces. One piece is complete shells. with some gold powder effect. And rest all are tools and cone work.


Here the impressions are using knife. When the ceramic is not completely wet and not dry too. You need to give all possible impressions. If you want you can also use comb as one of the tool.. For that you need to use wet ceramic. It should not be a complete dough, should be a bit loose.

Ceramic-mural-impressions-tools

Here is a complete cone work with mask effect.

Ceramic-mural-mask

These all make my completed Ceramic mural with all those African mask art on it.

Ceramic-mural-art

Note: The dough you make can be used for at least six months if you use it properly. Make sure you don't keep it open at all. It should be kept in wet cloth in an Air tight container. This will make your dough last for long.

I hope every one got an idea of making ceramic mural work. You can mail me if you find any difficulty.


Related Posts - Ceramic work

pot-painting-lovely-dove
pot-painting-Ceramic flowers on pot
Ceramic work on cup