Tuesday, December 30, 2008

Pencil Sketch - The Flamingo Bird

Pencil sketch is always one of my favourite drawing. Its easy and you will need to be very careful when u use the different pencils and the different stones of those pencil

Here I'll tell you the different pencils and the shades to which it need to be used.
Sketch using pencil looks attractive because of the use of light and dark shades.

Here is different pencil and different tones we can use using the particular pencil.
1. 2H pencil - This is used for "very light tone"
2. HB pencil - This is used for "light tone"
3. 2B pencil - This is used for "middle tone"
4. 4B pencil - This is used for "dark tone"
5. 6B pencil - This is used for "very dark tone"

You need to be careful about the short strokes, long strokes, vertical strokes etc.. In pencil sketching detailing is very important.

You need to study the sketch which you are going to make like for animals you need to be careful about the head study, shading of the side parts of any animal, hand hair's shadings and all.
In case of landscape the trees, birds the roots etc.

Here is the one I made. The beautiful Flamingo Bird.


Pencil-Sketch-Flamingo Bird

Sunday, December 21, 2008

Christmas Greeting Card - Quilling Craft with Calligraphy

Merry Christmas ! Yes, It's Christmas ! Time to enjoy, wait for Santa and get loads of gifts.It's also the time to show your near and dear ones that you care.So send Christmas Cards to all your friends, family and loved ones a joyous and wonderful Christmas with beautiful cards.

I'm ready with lot of beautiful greeting cards.
These are quillied greeting cards written on it with calligraphy style. This u can gift to someone as a normal greeting or you can frame it and gift as a show frame.
Most of them like handmade gifts. Its actually worth giving handmade gifts.

Try out this beautiful art form and enjoy this Christmas season.


This is the floral Quilling pattern on the card.

Quillied-Flowers

This is the content of the card. The Gothic font calligraphy is the style used.

Calligraphy

Here is the beautiful Christmas Card ready to gift.

Christmas-Greeting-Card

Tuesday, December 16, 2008

Christmas Cards - Gothic Font Calligraphy

Its time for Christmas and everyone will be busy sending cards and gifts ti your near and dear ones. So here is a handmade greeting card for Christmas.

Let us spread a message of Peace this time.

I used Tinted paper for card and a cut nib pen for Gothic font Calligraphy.

You can even use white colour for writing the message so that it will be more effective as its theme looks like the message of peace.

Try out and make your your own greeting card and gift it to your dear ones.

The one I made.


Greeting-Card-Gothic-Font-Calligraphy

Sunday, December 14, 2008

Quilling Pattern - Quillied Earrings

I am just loving this art, make whatever you want with these paper strips.

I made a pair of earrings out of this simple Quilling art. Just make the coil shape loosen it as much as you need and then apply glue to one end get the earring hooks and get your own accessories ready.

Isn't it amazing art, you can make different shapes sizes of accessories out of this.

I truly recommend to all craft lovers try this amazing art. You will enjoy making lot of these varieties of patters and designs for sure.

See this pair of earrings. Isn't it good?


Quillied-Earrings

Friday, December 12, 2008

Gothic Font Calligraphy

Calligraphy the art of beautiful writing. Yes, learning calligraphy is not that easy but very interesting and a great art.

Here I made a Christmas Greeting card using Gothic Font calligraphy. Gothic is an Old English Style Font. I used "Cut Nib Pens" for Gothic Font.

Try out some fonts using a right side cut marker or as i used the cut nib pen.

Practice a lot and you can be a good calligrapher.

Here is the Christmas Tree greeting card I made.


Gothic-Style-Calligraphy

Tuesday, December 9, 2008

How to make Organdi Cloth Craft

Organdi cloth craft is already made by me and you can check that in the earlier.
In my previous post Organdi Flower - Roses Beautiful Roses you can learn how to make these Organdi cloth flowers.

Its simple and the bunch of flowers looks beautiful.

I made the Organdi basket of flowers using a different basket.


Organdi-Cloth-Flowers

Organdi-Cloth-Craft

Sunday, December 7, 2008

Quilling Patterns - designs

I am back again with Quilling Art. I am very happy doing this craft as my first try itself was good and my second Quilling art also turned out amazing. I will be doing more on Quilling art.

Believe me try out this craft and you will enjoy for sure. Its simple and really creative. You can create any different designs you wish with these paper strips.

Check out my new work on Quilling Art.


Paper-Quilling-Art

Tuesday, December 2, 2008

Quilling Art

Today we will learn something about paper quilling. Paper Quilling Art is something very interesting and a different craft. Quilling is like creating little rolls from strips of paper and shaping them. Quilling art is getting popularity day by day. So try this beautiful art form.

Quilling is not expensive and done with easily available and affordable equipments.

Materials:
1. Paper Strips. (Quilling paper strips are easily available)
2. Glue
3. Quilling Needle

How to make it:

1. Take required length of the quilling strips and put one end of the strip into the quilling needle sloth.

2. Then you need to wind the paper to make it a coil shape. If you need a tight coil apply glue to the other end of the paper or if you need a loose coil remove the paper from the tool and allow it to loosen before glueing the end.

3. Squeeze the coil to the required shape with the help of your finger.

4. Place the shape on the card as per your design and in the same way repeat the process and make different shapes and designs out of these simple paper strips.

This is the quilling needle used for making the coil.


Quilling-Needle

And here is my first try on paper quilling art.

Quilling-Art

A beautiful greeting card of quilling.

Paper-Quilling-Art

Saturday, November 29, 2008

Cursive Font Calligraphy

This is the first time I came up with Calligraphy. I wanted to do this long back but didn't want to post something very simple like something on a paper or anything like that. Here I did calligraphy on a piece of mirror, this can be gifted to someone special.

So here is a new piece I tried out.

Materials I used:
1. Piece of mirror
2. Calligraphy Nib
3. Handmade paper

Cut a piece of handmade paper and stick it on the piece of mirror. Then using the calligraphy nib I just wrote some simple words with "CURSIVE FONT".

This is a thank you note written on the showpiece. Yes, this is a real beautiful showpiece that can be given to your favourite someone.

How is this piece of calligraphy I tried out?


Calligraphy

Saturday, November 22, 2008

Bull Wire Craft - Trendy bag

This is one trendy bag made of Bull Wire.

Even this bag need some 60 pieces of long bull wire. See the design made out of this wire. Its completely handmade. The design is made by tying each knot very tightly.

This looks awesome and a real trendy bag. After you finish making the bag just need to give it to a bag shop who will stitch it inside with silk cloth and a chain.

This is the handle made for the bag.


Bag-Handle

This is the main design pattern for body of the bag.

Main-Design-Pattern

So how does this completed bag look like?

Bull-Wire-bag

Friday, November 21, 2008

Fabric Painting

Here I am back again with fabric painting. Found some old Dupatta and thought of renewing it. Using some fabric colours and some good designs on it. I have made this plane dupatta look beautiful with lot of work on it.

To make this more beautiful you can do a running stitch over the outline of the design and add some beads to it.

This is a simple fabric paint design.


Fabric-Painting

Saturday, November 15, 2008

Bull Wire - Mobile cover

Normally looking at this you would think this is made of macrome thread or crochet thread. This is a different thread much thicker, this is as thick as a sack rope but you can make all different kinds of bags, batwas and mobile cover or anything you like to create and this thread is Bull Wire Thread.

Materials:

1. Bull wire thread (300gms approx)

Its always good to have coaching for this as its a bit difficult. You need to have a long thread cut into 20 pieces and then hang them into a rod which is placed on a max height just as the length of the wire.

You need to hang those wires and on the rod and tie them one by one into a design as per the required height and width.

It looks really beautiful and you can make lot of different varieties of bags and all.

Here is one I made.


Bull-Wire-Mobile-Cover


Its easy to use and looks really good.

Making-Mobile-Cover

Tuesday, November 11, 2008

Zardosi Work on Dress

Zardosi work on dress and Saree's are a blooming trend now a days. So why don't we try out some on our dress or Saree's. If you are new to doing this Zardosi work you can get a book for designs and know how to make it. You'll need some small beads, sequins, silver or golden or colourful spring wires, the thread to use for Zardosi work will be the jewelery making thread as its thick.

You can even make a frame work of Zardosi work as I did. You can check out the previous post of learning Zardosi work - The Dancing Peacock.

Get some designs and learn to make Zardosi and try it out on your own clothes and be proud to wear it.

Here is the one I tried out. It took a lot of time for me to complete, but I am very excited with the outcome.

This is the neckline work with some embroidery.


Neckline-Zardosi-Work

The continuation of neckline work.

Zardosi-Design

The completed work on dress.

Zardosi-Work-on-Dress


Sunday, November 9, 2008

Jute Material Craft - Making Mobile Cover

Making Mobile cover with jute material. Sounds interesting right!! Yes making this Mobile cover was interesting for me. Its after a long time I did something by sewing. It was quite interesting and I was very excited when I saw this simple little mobile cover ready. This was simple to do.

All you need is a rectangular piece of jute cloth OR you can even cut a piece of waste sack if you have. Then stitch two sides of it by sewing it leave some space in the top for the cover. Get a lace for the handle and stitch it along.

This is how you can get a simple handmade mobile cover. Handmade are always beautiful as you can make anything using your imagination.

Here is the one I made, I used waste sack and colour it using fabric colour. and decorate it with some sequins and try keeping it simple.


Making-Jute-Material-Mobile-Cover

Cross Stitch - The Peacock

This is my new work on Cross Stitch. In my earlier blog Creating Humming bird cross stitch art is shown where you can learn how to make Cross Stitch designs.

You can get lot of designs from any Art store. So get your favourite designs and start making cross stitch. Its fun, easy and the outcome is too good.

Here is the new one I made.


Cross-Stitch-Peacock-Design


Thursday, November 6, 2008

Ice Cream Sticks Craft

Craft made of Ice cream stick is a common art. Kids are more found of this as its fun. You can made lot of different things out of ice cream sticks like a house, wall hangings, basket, pen stand etc.

To make ice cream sticks craft you just need is lot of sticks and good imagination to make some craft out of it.

Here is a house of ice creams sticks and you will need around 100 sticks to make it some beautiful lace, thermocol balls, small dolls and other decorative materials.

Just apply glue on the sticks and make wall hangings or house or anything you wanna make out of it.

This is one I made. My dream Home.


House-Of-Ice-Cream-Sticks


Sunday, November 2, 2008

Embroidery Design on Cloth

Embroidery is a beautiful handicraft sewn on fabric or garment with colored threads and create a beautiful design. Embroidery can be by hand or machine.

Embroidery can be done on any kind of fabric. You can design your own dress, curtains, bedsheets, cushion covers, towels, Saree's, etc.

There are different varieties of embroidery stitches and lots of different designs. You can get these designs from anywhere in art store. A book can help to to learn different embroidery designs.

Here I did "Long Stitch" embroidery work on a kurta. I just used in this design is long stitches i.e. draw a design you like on fabric and take out any thread colour of your choice take the needle and thread inside from one end and then take it out from one end. You should use an embroidery ring so that the cloth will hold tight on it and the design can me made in a more neat and proper way. In this way do this stitches evenly on the design.

Here is the one made by me.


Long-Stitch-Embroidery-Design

Using some decorative beads or any other decorative items on the embroidery.

Embroidery-Design


Tuesday, October 28, 2008

Colourful Rangoli for Diwali

Happy Diwali to all my friends. Friends its Diwali time and everywhere you can see lights and crackers as Diwali is known as the "Festival of Lights". We celebrate Diwali by lighting diya, candles, bursting crackers.

Diwali is a festival of sweets, firecrackers, lights and of course the decorations. Not only decorating homes but even the streets, markets and all possible places are decorated with many lights and other Diwali decorations.

Diwali is decorated mainly with Diyas, Hangings, Rangolis, Lights and lamps.

To say about rangoli the whole Diwali time you can find rangoli drawn outside each and every house, shops and even people selling Rangoli powders gives a demo of Rangoli designs.

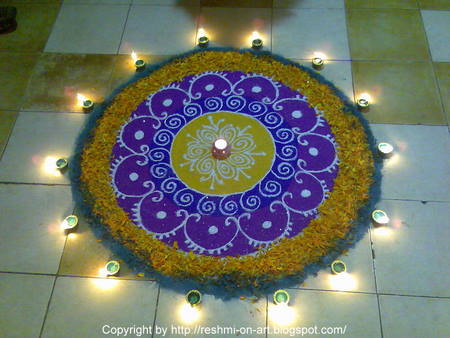
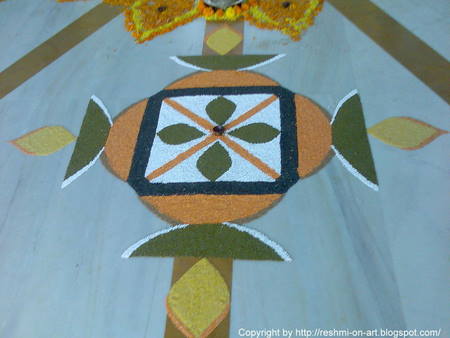
Here is the Rangoli I did in my office.


Rangoli

Sanskar-Bharati-Rangoli

This one is Rangoli using "Tandul". This means rangoli using rice, grains, peas, spice powders, pulses, Dal.

Rice-Grains-Rangoli

Sunday, October 26, 2008

Painting a Banyan Leaf

Painting on a banyan leaf is a different painting many of you might have heard of this. It will take a bit time to get the leaf into complete Net condition only with veins on them. I did soak at least 7 leaves and i got only 2 leaves properly out of it as some of them were in a bad condition.

How to make:
1. First of all you need some 2-3 banyan leaves and soak them in water for around 20 days.

2. After 20 days u can see the veins of leaves and other waste aside from the leaves.

3. Now wash the leave carefully in different water and remove all the waste from the leaves very carefully. Do it very slowly and carefully as there are chances of the leaves getting damaged.

4. After washing it and taking out properly you can see just the veins of leaves.

5. Now start painting your imagination on the leaves carefully using some 0-2 number brush.

6. The outcome of leaf painting is really beautiful.

Here is one of my creation.


Painitng-Banyan-Leaf

Sunday, October 19, 2008

Diya Decoration

Diya is a small lamp and it is also known as ‘Deepak’ or ‘Deep’. A “Diya” is a traditional candles. The relation of Diwali and Diya is just unique. Diwali is the festival of lights and the Diyas bring light to the world. So here you can make beautiful diya by decorating it. Diwali is the time when you can different designs of diya. You will get decorated beautiful diyas and you can get plane diyas also which you can decorate yourself.

So here are some tips to make your diya look beautiful.

1. Diyas look more beautiful by coloring them with different colors and giving them small floral designs.

2. Decorate your diya with some shells, beads, some glass pieces, golden lace and these decoration are for the plane diya that you will decorate.

3. Here you can even make a diya of your own with ceramic or POP (Plaster of Paris). You can make simple bowl shape for a diya and decorate it or you will get diya moulds easily available in markets. Make beautiful diya out of it.

4. These are some tips to decorate diyas.

So paint the Diyas and light them around your house as you can see handmade diyas look more beautiful and stunning as you light them up and the reflection of small mirror pieces will make your house look more brighter.

So try out and decorate your house this Diwali.

Here is the diyas decorated for you u can see different shapes of diyas.


Diya-Decoration

Wednesday, October 15, 2008

Candle Making

Friends its Diwali time so decorate your home with beautiful lights, and if the light is home made it can add more beauty to your home.

Candle making is one that can add some more beauty to the decorations. Gel candles are easy to make, but I had a difficult task making it as this was my first try in Candle making. Gel candles are burn longer than wax candles. You can try out different ways to make beautiful candles making layers or adding embeddings in glass containers or any other translucent container. Decorate your home with these beautiful candles made on your own.

Materials

Gel Wax
Candle Scents
Candle dyes
Wicks
Wick Base
Glass container

Method:

1. Firstly stick one end of the wick by a wick base or glue in the container. Suspend the wick vertically in the container by tying it to a split cane or a toothpick.

2. Melt the wax in a double boiler or in a bowl over a pan of simmering water. The gel wax may take more time for melting than paraffin wax.

3. Add any colour to it. You will want to add your color and scent fairly quick because the gel will set fast. Only liquid colour is recommended for optimum effects. (strictly only one or two drops, otherwise it may ignite the whole surface of the gel when you light them)

4.Pour the wax into the container - down the side to prevent bubbles. The higher the pouring temperature, the fewer bubbles.

5. If you want bubbles for effect, you should let the gel cool before pouring.

5. Pull the wick up straight and center it.

6. Once candle is fully cooled down it will be ready to burn.

You can create all kinds of interesting candles by pouring different colours of gel on top of each other. Allow each layer to completely set before pouring next.

You can even add some decorative items likes shells, sand, small stones, dried leaves etc. as per you wish.

In this way a beautiful gel candle is prepared. This will surly add more beauty to your home.

Here is the candles. The first one is with bubbles and rest with shells and beads.


Candle-Making

The burning candles.

Gel-Candle-Making

Monday, October 13, 2008

Ceramic Pen Stand

Uses of ceramic powder is many, you can make lot of things using ceramic. Ceramic pen stand sounds different but its nothing different than the making of ceramic pot painting. Its not only designing pot using ceramic powder there are different things you can make out of this ceramic dough.

Here I made a beautiful and useful pen stand.

Materials:
1. Ceramic powder
2. Fevicol
3. Hardboard

How to make:

1. Make dough of ceramic by mixing ceramic powder and fevicol and take small pieces out of it, roll the dough as shown.


making-penstand

2. Now make it into triangle shape or any shape that you like to.

Shaping-pen-stand

3. Now place these pieces one above the other and make a beautiful pen stand.

4. After drying it colour the stand and decorate it as you want.

Handmade things are always natural and good looking, so here is one beautiful handmade pen stand for you. You can make different shapes and sizes.

Here is the one I made.


Ceramic-Pen-stand

Ceramic Pot Painting

This is another Ceramic pot painting, this one is a different design. You can learn how to make ceramic pot painting from my previous post of Ceramic Pot painting.

This piece of work was done in the same way but a different design. You an make any designs like figures, flowers or just tapping some ceramic here and there and painting on them with different colours with ceramic dough. So try out some different designs.

This is the new piece I made out of ceramic.


Ceramic-Pot-Painting

Ceramic Pot Painting is always a good showpiece.

Cmaking-Ceramic-Pot

Sunday, October 12, 2008

Making a Decorative File

File making, making a file is really interesting as we are making something that is useful. You may have some old files which you don't use. So we are trying make some old file into something that can be reused.

All you need is an old file with some decorative items like ribbon, plastic mirror, lace or anything that you have with you.

How to make it:

You have to cover your old file completely using the card paper, then decorate it using the materials you got.

Be creative and make beautiful and useful files.

This flower is make of duplex paper.


Duplex-paper-flower

This is the inside portion of file.

File-Inner-Portion

This I made using lace, plastic mirrors, lace and matte material.

Making-Decorative-File

Tuesday, October 7, 2008

Navratri Matka Decoration

Happy Navratri to all.

Navratri, the festival of nights, lasts for 9 days with three days each devoted to worship of Ma Durga. During the nine days of Navratri, feasting and fasting take precedence over all normal daily activities amongst the Hindus. Evenings give rise to the religious dances in order to worship Goddess Durga Maa.

On this festive season our office celebrates each day beautifully and then came across Matka Decoration which is also called as "Garba Decoration" or "Garbu Matki".
Each one of us was provided with pot and was asked to decorate using our own creativity maintaining the traditional look of the Matka.

So here is one I made and I came out to be the winner.


Navratri-Matka-Decoration

So my Warli painting worked here too. I made the dance form of Warli painting sticking some colourful beads and using some colours to make it more beautiful.
In the middle of the Warli painting is used "Swastik". Swastik is being used as Luck Charm. Swastik is drawn on the gates to prevent houses from evil eyes. Its also said "Shubh Labh" i.e. good luck with prosperity.


Navratri-Matka-Kalash

Kalash has many symbolic meanings- it is the primordial waters, the soul filled with love and compassion, abundance, and hospitality. The coconut is a symbol of the God head- the three eyes symbolic of the eyes of Vishnu. Kalash is for good luck, good fortune and all-round happiness and well being when this divine kalash is kept.

Navratri-Traditional-Bandhani

Bandhani is a complete tradition of Gujarat can also be said as Traditional wear of Gujarat. So the Matka got the Traditional Bandhani with beautiful Golden lace on it and some mirror work to make it look more traditional and attractive.

Navratri-Bandhani-Mirror-Work

Monday, September 29, 2008

Duplex paper flowers - Anemone Flowers

Anemone Flowers, the name means Wind Flower. This is really a beautiful flower. You might have noticed I make most of the flowers using Duplex Paper, this is just because the paper colours are just fresh than crape paper and this paper is much thicker than crape which can be easily taken in to any shape.

So lets start with Anemone Flowers.

Materials:
1. Duplex Paper (Any colours)
2. Aluminium wire
3. Black Pollens
4. Green Crape paper
5. Green tape
6. White thread
7. Cotton fibre
8. Fevicol

How to make Anemone Flowers:

1. Firstly there are two shapes of petal to be made for this flower. Make the first petal "Petal A" as shown.


Step1

and make one more petal say "Petal B" as shown.

Step2

2. Now stick take "Petal A" and apply fevicol all over the petal place a piece of aluminium wire over the petal and stick the other petal over it the same petal A.

*Petals are to be made in the same way as I made other duplex paper flower petals*

2. Now twist the petal and make similarly 6 more petals according to Petal A and Petal B.

3. Take a piece of aluminium wire cover it with some cotton fibre and make a global structure.

4. Cut a round piece of green crape paper and cover the cotton with the green piece and tie the bottom with thread.

5. Take around 25-30 pollens and arrange these around the green globular structure in a proper circular way and tie it tightly with thread.

6. Take 3 petals of "Petal A" and arrange it properly and again take the remaining three petals and arrange it in between each of these petals.

7. Now take "Petals B" and arrange it in the same way as "Petal A" was arranged.

8. Now arrange after making the proper arrangement you can get a really beautiful Anemone Flower and now cover the remaining aluminium wire using green tape.

9. Arrange it in a beautiful basket.

This flower is a bit time consuming but results come out really good.

Here is one for you.


Making Anemone Flowers

Anemone Flowers

Related Posts - Duplex paper flowers

Duplex paper flower - Valentines colourful bouquet of flowers
Duplex paper flower - Duplex paper Carnation flowers
Duplex paper flower - Duplex paper Camellia flowers
Duplex paper flower - Duplex paper Lilly Flowers
Crape paper flower - Crape paper Yellow sunflower